
Iris Folding
Iris folding is a paper craft technique that involves folding strips of colored paper in such a way to form a spiraling design. The center of the design forms an iris — similar to the shape of the iris of a camera lens.
Iris folding originated in Holland. Designs initially were made using patterned paper cut from the inside of envelopes. Any light weight paper, such as scrapbook paper, origami paper, wrapping paper, the inside of envelopes, pages of magazines or even ribbon can be used. I would not recommend using card stock. It becomes too bulky when folded in half. The Designer Series Paper from Stampin’ Up! is perfect for Iris Folding.
Iris Folding can be used as the front of a greeting card, as a scrapbook embellishment or on numerous other paper crafting projects.
Supplies for iris folding include a pattern, strips of colored paper, permanent adhesive, cutting tools and a temporary tape such as painters tape. The temporary tape is used to hold the pattern in place while the design is created.
Iris folding always begins with a pattern. Iris folding patterns are available in books or can be downloaded from numerous web sites. My favorite patterns are found in the book Iris Folding Compendium, Iris Folding with Iris Folding Paper and Iris Folding with Greetings by Maruscha Gaasenbeek and Tine Beauveser. I purchased this several years ago through Amazon.com.
The main 3 patterns for Iris Folding are the square, the circle and the triangle. Click on the link below to view.
A video tutorial on Iris Folding can also be found at the end of this post.
Quilted Iris Folded Victorian Shoe

Recently, I was contacted by quilter Kathy Cox who shared her beautiful quilted Iris Folded Victorian Shoe based on the Iris Folded Victorian Shoe I created way back in 2011!
And on top of that, she made it in purples!
Of course, my Victorian Shoe was Iris Folded with paper.

I was thrilled to see this work of art, and honored that I offered some inspiration.
Kathy says that she had to rearrange the numbers since the Iris has to go in first with fabric quilting.
When asked if this was going to be a part of a larger quilt, Kathy said, “No it will not be part of a quilt. When I made it, I had a rug mug in mind. It is almost too small for a cup, but there is a little room to the left of the shoe. My next one I will make a tad larger.”
So exciting that Iris Folding can be translated into fabric quilting.
Thank you Kathy for sharing!
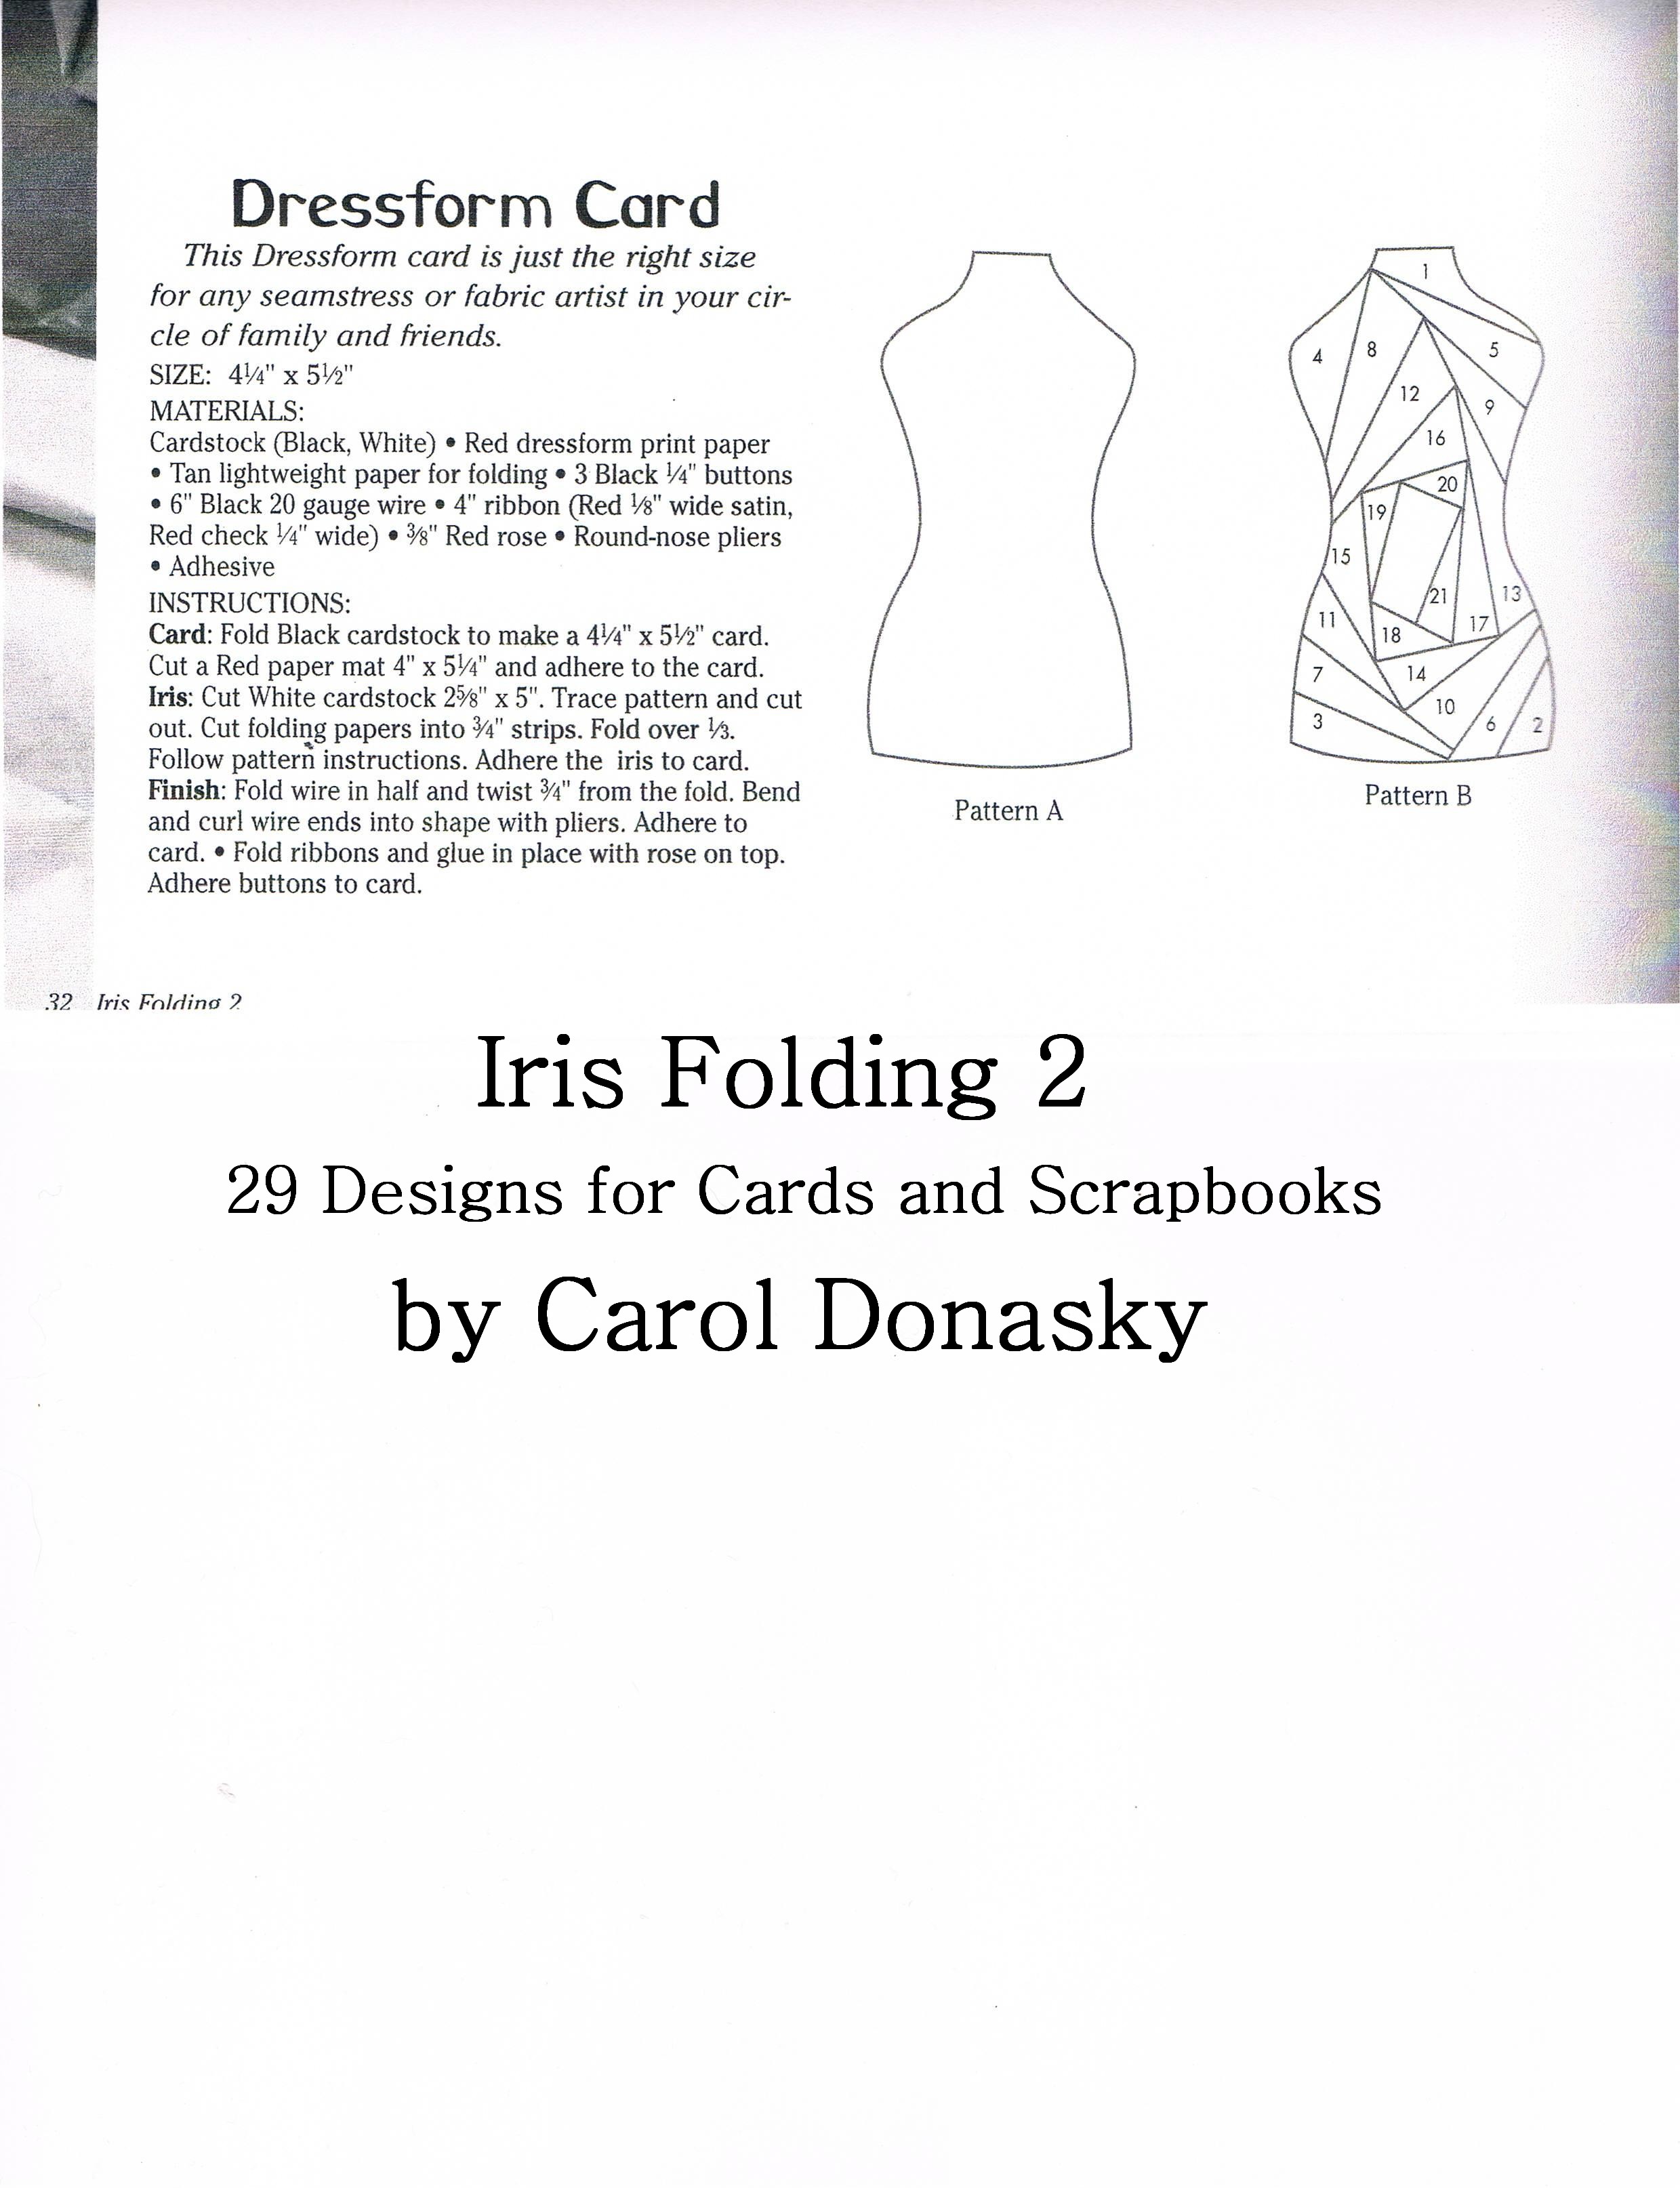
Iris Folded Dress Form

Recently, while going through my iris folding patterns, I came across this iris folded dress form I created way back in 2012 using some pretty black and gold designer series paper.
You can’t tell from the photo, but the paper for the “iris” has a raised velvet texture.
I decided I better use it to create a quick card!
All I had to do was mat it to a piece of Gold Foil and Basic Black card stock, add a button with some sparkly thread through the button holes, mount it to a Very Vanilla card base, and stamp the greeting from Beautiful You in Memento Black ink.
Click HERE to download the iris folding dress form pattern
Garden Impressions Iris Folded Heart

Here’s another iris folded heart card using designs found in the Garden Impressions 6″x6″ Designer Series Paper.
I love the abstract designs found in the collection, perfect for iris folding!
The card front is Soft Sea Foam that was embossed using the Gently Falling embossing folder.
The greeting is from retired stamp set All Holidays stamped in Night of Navy.
The ribbon is Dapper Denim Crinkled Seam Binding with an enamel shape added to the bow.
Supplies Used:
Stamp Set: All Holidays
Ink: Night of Navy
Paper: Crushed Curry, Tranquil Tide, Soft Sea Foam, Garden Impressions 6″x6″ Designer Series Paper
Accessories: heart iris folding pattern, Big Shot, Hearts Framelits Dies, Gently Falling embossing folder, Dapper Denim Crinkled Seam Binding, enamel shape
Iris Folded Heart

My best friend’s son is getting married!
What a great occasion to make a card!
One of the easiest Iris Folding patterns in a heart. Perfect for creating a wedding card!
Here’s how:
- Start with this iris folding heart pattern. Print out on your computer.
- Cut out a heart from your card front using the Big Shot and framelits, a punch, or by hand with scissors. For this card, I used my Big Shot and one of my Hearts Framelits Dies that closely fit the printed pattern.
- Emboss the card front if desired. For this card, I used the hearts from Adorning Accents Embossing Folder. Stamp your greeting. I used Sincere Salutations stamped in Rich Razzleberry. Do any embossing or stamping before you start the Iris Folding technique as your card front will become too bulky to do anything else without messing it up.
- Lay the embossed card front face down onto the printed heart pattern. Remember, you always work from the BACK of your project when doing iris folding. Apply a couple of pieces of washi tape to one side of the card front to act as a hinge so you can flip the card front over to see your progress from the front.
- Choose 3 patterns of designer series paper. For this card, I used designs found in the retired pack Blooms and Bliss. I cut two 1/2″x12″ strips of each design.
- Apply SNAIL adhesive along the edges of the heart cut out. Following the pattern, apply the strips of designer series paper, adding SNAIL adhesive as needed to secure the pieces.
- Apply the iris to the center. For this card, I used Blushing Bride glimmer paper.
- Remove the washi tape and adhere iris folded card front to Rich Razzleberry mat.
- Cut out a frame for the heart using 2 nested heart framelits. I cut the frame out of more Blushing Bride glimmer paper.
- Attach to Blushing Bride card base.
- Optional: punch 2 hearts out of Rich Razzleberry card stock using a small heart punch. Attach to the front of the card using Dimensionals to pop them up. Add Blushing Bride enamel shapes to complete.
Supplies Used:
Stamp Set: Sincere Salutations
Ink: Rich Razzleberry
Paper: Blushing Bride, Rich Razzleberry, Whisper White, Blooms and Bliss Designer Series Paper, Blushing Bride glimmer paper
Accessories: iris folding heart pattern, Big Shot, Hearts Framelits Dies, Adorning Accents Embossing Folder, heart punch, enamel shapes, SNAIL adhesive, Dimensionals, washi tape
Iris Folded Christmas Ornament

Click here for the basic iris folding patterns including the circle used to make this card.
Here’s how to make this ornament card:
- Emboss Whisper White card front using the Big Shot and Winter Wonder Embossing Folder.
- Punch a circle out of the snowflake/card front using the 2 ½” circle punch.
- Print out circle iris folding pattern. Lay card front face down over the iris folding pattern. * In Iris Folding, you will always work from the back. Adhere the card stock to the pattern on the right or left side only using washi or painter’s tape, creating a hinge, so you can lift up your card stock to check the progress on the front side as you go.
- Decide on your design and cut your paper into strips. The number of strips needed will depend on the pattern and the length of the paper. This pattern has 4 sections, so I chose 4 patterned papers from Christmas Around the World 12”x12” and Quilted Christmas 6”x6” Designer Series Paper, cut into ½” wide strips.
TIP: Once you have decided on and have cut the paper you’d like for your design, lay the strips in front of you in the order that you will be using them. Keep them in this order as you are working on the pattern. Or write down a description of the design (circles, stripes, solids, etc.) and number them in the order of use in the margins of the pattern you are following. It can get confusing once you begin working with the paper, especially if you are working with a more complicated pattern. And remember, the design on the back side of the paper will be what you see as you fill in the pattern.
- Apply SNAIL Adhesive around the edge of the cut pattern. Begin with design #1 and following the pattern guide, place it over the first section #1, placing it against the line of the pattern with the straight edge facing towards the center. Trim with a pair of scissors or hand-tear the paper to the size needed to fill the space.
- Repeat, using the other 3 paper designs, filling in each section following the numbers around the pattern. You’ll need to add strips of SNAIL to the ends of the bottom strips as you work around to secure the pieces together.
- Continue adding designer paper until the pattern is filled in, leaving the center space open. The center of the design forms an iris, similar to the shape of the iris of a camera lens.
- It is time to add the iris to the center. Use a stamped or punched image or an attractive piece of paper to cover the hole in the middle, again adhering it from the back. For this card, use a piece of red glimmer paper secured with a piece of washi tape.
- To tidy up my iris folded pieces, I always add a piece of card stock to the back to hide the strips of paper. This is optional.
- For the ornament top, cut a piece of red glimmer using the Big Shot and Quilt Builder Framelit die. Attach to the top of the circle.
- Stamp greeting from Snowflake Sentiment using Real Red ink.
- Tie a bow out of the ¼” Quilted Christmas ribbon and attach to the top of the ornament using a Mini Glue Dot.
Supplies Used:
Stamp Set: Snowflake Sentiments
Ink: Real Red
Paper: Whisper White, Real Red, Red Glimmer, Christmas Around the World and Quilted Christmas Designer Series Paper
Accessories: Circle iris folding pattern, 2 1 /2″ circle punch, Big Shot, Winter Wonder Embossing Folder, Quilt Builder Framelits Die (for the ornament topper0, 1/4″ Quilted Christmas ribbon, washi tape, Mini Glue Dpt
Iris Folded Kiss

Here’s an Iris Folded Kiss for you for Valentine’s Day!
Supplies Used:
Stamp Set: Teeny Tiny Wishes
Ink: Early Espresso
Paper: Blushing Bride, Early Espresso, Silver Glimmer
Accessories: Big Shot, Falling Petals Embossing Folder, Word Window and Modern Label punches, Dimensionals, Kiss Iris Folding pattern
Paint Chip Iris Folded Kiss

I decided to combine 2 of my favorite crafting techniques, Paint Chips and Iris Folding, to create this fun Kisses card just in time for Valentine’s Day.
To see more Paint Chip samples, please visit my Paint Chip Page HERE
On a recent trip to our local home improvement store, I stopped in the paint department and picked up a few paint chip samples.
Here was the paint chip inspiration for my Kisses card!

To start, I traced around the “kisses” pattern onto my Whisper White card front using a pencil, then cut it out using a pair of scissors.
I then embossed my Whisper White card front using the Big Shot and Falling Petals Embossing Folder. This folder embosses sweet falling hearts, perfect for a Valentine’s, anniversary, or love card.
I cut the last three colors of the paint chip into 1/4″ to 1/2″ wide strips, working around the name of the paint color on the bottom of each section and then began following the “kisses” iris folding pattern after securing the card front over the pattern using masking tape.
Remember, work from the back!

The center or “iris” is a piece of silver glimmer paper that I colored with a black Sharpie pen. It becomes more gray, complete with sparkle.

After I had completed the Iris Folding, I secured a scrap piece of card stock on the back of the iris folding just to cover and help secure the strips. Then, I matted it to a piece of Island Indigo card stock. I stamped my “Friend” greeting from the stamp set Bloomin’ Love onto my Smokey Slate card base (love how it matches the color on the paint chip) and then attached the iris folded kiss using Dimensionals to pop it up.
To complete the card, I cut a portion of the banner from a Hershey Kiss and slipped it underneath the iris fold at the top using a small amount of SNAIL Adhesive.
Paint Chip Iris Fold Kiss! Happy Valentine’s Day!
Supplies Used:
Stamp Set: Bloomin’ Love
Ink: Island Indigo
Paper: Smokey Slate, Whisper White, Island Indigo, silver glimmer
Accessories: paint chip, Big Shot, Falling Petals Embossing Folder, Sharpie pen, Dimensionals
A “happy place” iris folded winter scene-Happy Winter!

Here is a slightly different take on my iris folded snow globe project originally posted here.
I decided that I didn’t want to make it a snow globe, but rather just use the circle from the snow globe pattern to create a little winter scene.
The designer paper comes from the retired pack International Bazaar, and the little houses come from the November 2016 Wonderful Wonderland Paper Pumpkin kit. They were already Pool Party in color which matches the blue in the designer paper. I simply added a small piece of So Saffron behind each one to give a warm glow coming from the windows. The “iris” is Dazzling Diamonds Glimmer paper with Rich Razzleberry ink sponged on. The greeting comes from another Paper Pumpkin kit All About Everything.
Supplies Used:
Stamp Set: All About Everything (April 2016 Paper Pumpkin bonus stamp)
Ink: Rich Razzleberry
Paper: Rich Razzleberry, So Saffron, Pool Party, International Bazaar DSP, Dazzling Diamonds Glimmer
Accessories: 2 1/2″ circle punch, Big Shot, Zig Zag embossing folder, Circle and, Itty Bitty Banner framelits, Wonderful Wonderland Paper Pumpkin kit, sponge, rhinestones, Sharpie Pen, Dimensionals
Iris Folded Snow Globe

It’s been awhile since I’ve done any iris folding. Not sure why since it is one of my all-time paper crafting techniques!
I did a quick search on Pinterest, and found a really fun snow globe pattern from iris-folding.com
The pattern can be found here.
It is basically a circle pattern so it is super simple.
(For an Iris Folding how to video tutorial, please check at the bottom of this posting.)
I first embossed my Mint Macaron card front using my Big Shot and Gently Falling Embossing Folder. I then punched out the circle using my 2 1/2″ circle punch.
I laid the card front over the pattern I printed out from Iris-Folding.com (remember, place the front side down-you’ll be working from the back), and started laying out my designer paper (Blooms and Bliss cut into 1/2″ strips).
The “iris” is Dazzling Diamonds Glimmer paper with Island Indigo ink sponged on to make a custom color to match the colors in the designer paper and the snow globe.
(Creating your custom color glimmer paper is easy-see instruction here).
The trees are pieces found in the November Wonderful Winterland Paper Pumpkin Kit. In the kit, they are white so I simply stamped the coordinating image from the stamp set using Mint Macaron ink. They are popped up using Dimensionals.
The ring around the snow globe was cut out of Island Indigo card stock using my Big Shot and 2 layers of circle framelits.
I didn’t care for the base of the snow globe in the pattern, so I cut a triangle free hand out of Island Indigo card stock.
Since I’m pretty much done with Christmas cards, I wanted this to be a winter wishes, Happy New Year or even a thank you card.
I searched through my stamps and found this small “hello” and scribble that I knew would work with my 7/8″ and 1 1/4″ scallop circle punches. Layering the 2 punches would fit perfectly on the front of the snow globe.
To complete the card, I added a few rhinestones for bling and mounted it to a Whisper White card base.
This Iris Folded Snow Globe was a great way to revisit one of my favorite paper crafting techniques!
Supplies Used:
Stamp Sets: Pennant Parade and Kindness Matters (both retired), Wonderful Winterland
Ink: Island Indigo, Mint Macaron
Paper: Whisper White, Mint Macaron, Island Indigo, Dazzling Diamonds Glimmer, Blooms and Bliss Designer Series Paper
Accessories: Big Shot, Softly Falling Embossing Folder, Circles Framelits, 2 1/2″ circle, 7/8″ scallop circle and 1 1/4″ scallop circle punches, Wonderful Winterland Paper Pumpkin Kit, sponge, Dimensionals, rhinestones
Simple Iris Fold Christmas Ornament

This is a card I created for a Nacho Average sketch challenge using Winter Wonderland Specialty Designer Series Paper from Stampin’ Up!
This ornament is a simple circle with only 3 sections completed, allowing the “iris” in the center to be larger. I started by punching a piece of Whisper White card stock using my 2 1/2″ circle punch. The black and white patterned designer series paper was adhered first at an angle creating a point at the top, bottom and 2 sides of the circle. The gold and white scrolly paper was added next, then the black and white lined paper. All were lined up to meet at the same point creating a square in the middle for the gold pine cone paper.
No real pattern was used for this circle as it is a pretty simple iris fold.
As always, remember to work at the back of the piece.
Stamp Set: Teeny Tiny Wishes, To You and Yours Too (ornament hanger)
Ink: Basic Black, Versamark
Paper: Brushed Gold, Basic Black, Whisper White, Winter Wonderland DSP
Accessories: 2 1/2″ circle punch, heat tool, white embossing powder, 1/8″ gold ribbon
Iris Folded Beach Scene
Our swap theme for the May Saturday Stamp Club was “seashells” or “beach.” Living here in the mountains of southern Colorado, sea or beach themed stamps and paper really aren’t in my stash of supplies. It’s not that I don’t like this theme. It’s just not relative to my surroundings. So, I turned to one of my favorite paper crafting techniques to help me: Iris Folding! I knew I could create a sunset beach scene using various designer series papers.
Here’s what I came up with:

I started with a pattern I found in the book Iris Folding by Michelle Powell. I don’t want to share the pattern here because it is copyrighted, but a quick internet search will bring up several free iris folding pattern sites. Pinterest is always a good place to look for ideas and patterns.
Here’s one shared by the Circleofcrafters.com site (a great site with many FREE patterns and ideas!):

I used a variety of Designer Series Papers, some retired, some not. I added some sand castle stickers that I found on sale at our local ***mart for a little 3D effect. I wish I had more beach-themed greetings to use, but alas, it is not so. I chose the Happy Birthday stamp from the retired set Holidays and Wishes because it was long and I’ve always like the font.
Stamp Set: Holidays and Wishes
Ink: Island Indigo
Paper: Whisper White, Island Indigo, various Designer Series Paper
Accessories: Paper trimmer,1 1 /4″ circle punch, sand castle stickers
Thank U Maple Leaf Iris Folding

Maple Leaf pattern is found on circleofcrafters.com
Stamp Set: A Round Array
Ink: Cajun Craze, Soft Suede
Paper: Very Vanilla, Soft Suede, Color Me Autumn Designer Series Paper, Champagne Glimmer
Accessories: Big Shot, Woodgrain embossing Folder, 1 1/4″ scallop circle punch, Crushed Curry polka dot ribbon, Linen Thread, sponge, Dimensional, Maple Leaf pattern
Ray of Sunshine Iris Folded Landscape

I found this great pattern on CircleofCrafters.com
(for those of you who may not know, CircleofCrafters.com is a great resource for free iris folding patterns)

This is not a traditional iris folding pattern because there isn’t an “iris.” But, the possibilities are endless, and I knew I had to give it a try.
I printed the pattern, reduced it by 65% and then copied it again. It was then a perfect size for a traditional 5 1/2″ x 4 1/4″ card. You may have to play with the original pattern to get the size that you would like.
I used scraps of Flower Pot and Park Lane Designer Series Paper. The greeting is from Ray of Sunshine. I think it goes perfectly with this pattern.
Supplies Used:
Stamp Set: Ray of Sunshine
Ink: Blackberry Bliss
Paper: So Saffron, Blackberry Bliss, Whisper White, Tangelo Twist, Crisp Cantaloupe, Flower Pot and Park Lane Designer Series Paper
Accessories: iris folding pattern, paper trimmer, 1 1/4″ and 1 3/8″ circle punches
Iris Folded Stellar Jay

I found this great Cardinal pattern created by Aga Piechocińska on Pinterest and knew I had to give it a try. Although the pattern was originally a Cardinal, we don’t have Cardinals here in the mountains of SW Colorado. We do have Stellar Blue Jays though. The pattern works perfectly for both!
I used several different Designer Series Papers. Some are retired, some are not.
Supplies Used:
Stamp Set: Good Greetings
Ink: Island Indigo
Paper: Island Indigo, Soft Suede, Whisper White, Crisp Cantaloupe, various Designer Series Papers
Accessories: Big Shot, Polka Dots Embossing Folder, Word Window, Modern Label and Bird Builder punches, candy dots, Dimensionals
Gold Soiree Iris Folded Wrapped Birthday Present

For this card, I used the basic square pattern. I used my Big Shot and one of the Squares Framelits to cut out the center of the Pistachio Pudding card front. Using the framelits gives you a straight and clean edge and is so easy!
Stamp Set: Good Greetings
Ink: Calypso Coral
Paper: Gold Glimmer, Pistachio Pudding, Gold Soiree Designer Series Paper
Accessories: Big Shot, Squares Framelits, Stripes Embossing Folder, Word Window and Modern Label punches, Calypso Coral Seam Binding, Gold 1/8″ ribbon, Mini Glue Dot, Tombow Multi-Purpose Glue
Sweet Sorbet Iris Folded Christmas Tree

I found the pattern for this Iris Folded Christmas Tree on Pinterest here: canardette.c.a.pic.centerblog.net
Supplies Used:
Stamp Set: Pennant Parade
Ink: Basic Black
Paper: Summer Starfruit, Basic Black, Whisper White, Sweet Sorbet Designer Series Paper
Accessories: Big Shot, Decorative Dots Embossing Folder, Jewelry and Itty Bitty Shapes punches, rhinestone, Iris Folding pattern
Iris Folded Chili Peppers

Change the greeting on this one, and it would make a perfect Christmas card!

Stampin’ Up! supplies:
Stamp Set: Bitty Banners
Ink: Garden Green
Paper: Whisper White, Cherry Cobbler Designer Series Paper, Cherry Cobbler (card 1) Red Glimmer (card 2), Garden Green
Accessories: Big Shot, Stylish Stripes Embossing Folder, Itty Bitt Banners Framelits, Linen Thread, Mini Glue Dots
Simple Iris Folded Square
For these cards, I used a great, but simple square pattern found on Splitcoaststampers. It only has 2 segments, but makes quite a statement!
Because of the size of the elephant and cupcake images, I needed the iris to be larger than the original pattern. So, I enlarged it to 150% before printing it out.

Stamp Set: Patterned Occasions
Ink: Melon Mambo, Tempting Turquoise, Daffodil Delight markers
Paper: Whisper White, Melon Mambo, various Designer Series Paper
Accessories: Iris Folding pattern, paper trimmer

Stampin’ Up! supplies Used:
Stamp Set: Patterned Occasions
Ink: Basic Gray, Markers: Bermuda Bay and Lucky Limeade
Paper: Whisper White, Basic Gray, scraps of Designer Series Paper
Accessories: Iris Folding Pattern
Iris Folded Christmas Ornament

Supplies Used (all supplies are Stampin’ Up! unless otherwise noted)
Stamp Set: Four the Holidays
Ink: Island Indigo
Paper: Bashful Blue, Early Espresso, Very Vanilla, Island Indigo (for the iris),Festival of Prints Designer Series Paper
Accessories: Big Shot, Northern Flurry Embossing Folder, Circle Epellbinders Nestabilities (non SU!),flower and rhinestone brads, paper piercing tool and mat, rhinestone, Dimensional
The ornament was made using a basic Iris Folded circle pattern and can be found HERE
Iris Folded Heart

I used this heart pattern, courtesy of Gemscottage


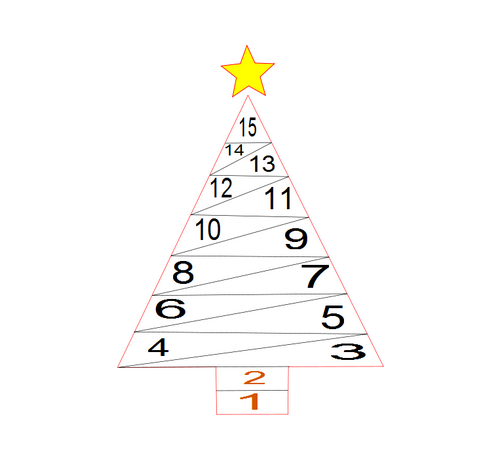
Iris Folded Christmas Tree

(For more Iris Folding samples, instructions and a video tutorial , please scroll through this page. The video is at the end)
For this card, I used scraps of the Designer Series Paper Travel Journal.
I used Silver Glimmer paper for the “iris”, the tree base and star. The tree base was cut free-form out of a scrap piece of Silver Glimmer.
The tree is a triangle which is a basic iris folding pattern. Here is a simple triangle pattern I found online at familycrafts.about.com

Supplies Used (all supplies are Stampin’ Up! unless otherwise noted)
Stamp Set: Tiny Tags
Ink: Night of Navy
Paper: Bashful Blue, Whisper White, Night of Navy, Travel Journal Designer Series Paper, Silver Glimmer
Accessories: Big Shot, Polka Dots Embossing Folder, Star, Jewelry and Itty Bitty Punch Pack punches, rhinestone, Dimensionals, Mini Glue Dots, Iris Folding triangle pattern from familycrafts.com
Pumpkin Iris Folded Card
This iris folded pumpkin card was inspired by a Hershey “Pumpkin Spice” Kisses candy that my friend Joyce Lovato recently gave me. Thank you Joyce!!
I peeled off the foil wrapper and the “Pumpkin Spice” paper banner and thought that they would make great accents for a pumpkin iris folded card. Remember, inspiration comes from all around and remember, never throw anything away!

I used Designer Series Paper from my stash. Iris folding is a great way to use up paper scraps. I used a piece of the foil candy wrapper for the center iris.

I used the pumpkin pattern found in my book Iris Folding 2 by Carol Donasky. Since the images in her book are copywrited, I searched the internet for a free pumpkin pattern. I found this circle pattern which will work to make a pumpkin on the website CardsbyJen.

Color Pattern:
Color 1: 1, 5, 9, 13
Color 2: 2, 6, 10, 14
Color 3: 3, 7, 11, 15
Color 4: 4, 8, 12, 16
Supplies Used: (all supplies are Stampin’ Up! unless otherwise noted)
Stamp Set: Thank You Kindly
Ink: Early Espresso
Paper: Very Vanilla, Garden Green, Crumb Cake, various Designer Series Paper out of my stash
Accessories: Big Shot, Elegant Lines Embossing Folder, Blossom Petals Builder and Bird Builder punches (for the leaves and stem), Hershey “Pumpkin Spice” Kisses candy foil and banner
Iris Folded Chick Card

As always, work on the back side and do any embossing before you start the Iris Folded pattern.
Here’s a link to a similar chick iris folding pattern found on circleofcrafters.com. (The one I used is copyrighted in the book Iris Folding Compendium by Maruscha Gaasenbeeck and Tine Beauveser) Circleofcrafters.com is a great resource for free iris folded patterns.
Supplies Used:
Stamp Set: Teeny Tiny Wishes
Ink: Marina Mist
Paper: Early Espresso, Marina Mist, Whisper White, Pumpkin Pie, various Designer Series Paper
Accessories: Chick Iris Folding pattern, Big Shot, Top Note die, Polka Dot and Square Lattice embossing folders, Modern Label and Word Window punches, Paper Piercing Tool and Mat, rhinestone brad
Iris Folded Dress Form
Click here to view the Iris Dress Form pattern


Iris Folded Kiss
This is a perfect pattern to use for a Valentine or thinking of someone special card.
Click here to view the Kiss pattern.


Change it up by using reds and pinks for a more traditional Valentine’s or use silver glimmer paper like I did with this card.


The kiss pattern is a very straight forward and easy to follow. The first color will be placed on sections marked A, the 2nd color will be placed on sections marked B and the third color will be placed on sections marked C.
And as always, work from the BACK SIDE of the project and do any stamping or embossing before you start Iris Folding.
I actually did not fold the designer paper in half as you would traditionally do with Iris Folding because I wanted to keep down the bulk on the back side. This is especially true with the heavier-weight glimmer paper. Instead, I cut 3/4″ wide strips and placed the edge of the paper against the edge of the pattern.

Iris Folded Cowboy Boot

For the cowboy boot, I used the pattern found on circleofcrafters.com
There is not really anything out of the ordinary when creating this boot. Follow the basic Iris Folding instructions below. If you are going to emboss the piece with the boot, do so before starting the Iris Fold. And remember, always work from the BACK side of your project. I used the same paper for all sections of the pattern except for the section 1 which is the heel.
Iris Folded Victorian Shoe

For the Victorian Shoe, I used this pattern found on HERE
Print out the pattern and reduce to 80%. Print again, making 2 copies. You will cut out the shoe from one of your copies. This will be the one you use to trace the pattern that will be cut out from your card front. The 2nd copy needs to remain intact. This copy will be laid on your work surface face up with the card front with the shoe cut out of it placed on top. It will also have the pattern you will follow. I reduced the original pattern because it was just a little too big to fit on a standard 5 1/4″ x 4″ card front.
Be sure to do any embossing or stamping prior to starting Iris Folding. The front of the image will be too bulky to do any of this after the Iris Folding in complete.
Remember, you always work from the back side of your project.
1. Cut out the shoe from one of your printed patterns. Lay it on the back side of your project face up. Trace the outline of the shoe with a pencil.
Photo 1: Printed shoe pattern cut out and ready to be traced onto the back side of the project:

Photo 2: Back side with traced shoe pattern, ready to be cut out:

2. Cut out the shoe using a pair of scissors. I find it makes cutting the pattern out it easier if you start a hole somewhere inside the shoe by using a small hole punch.
Photo 3: View of front side, embossed, stamped and with shoe cut out. For this card, I used my Big Shot die cut machine and Framed Tulips Embossing Folder. I also stamped “Friend” from the From the Heart Vogue stamp set from Stampin’ Up!

3. Lay your 2nd printed pattern face up on your work surface. Lay the cut card front over the pattern BACK SIDE FACING UP
Adhere the card stock to the pattern on the right or left side only using painter’s tape, creating a hinge so you are able to lift up your card stock to check the progress on the front side as you go.
Decide on your design and cut your paper into strips. The number of strips needed will depend on the pattern and the length of the paper. I usually cut the paper into 3/4″ x 12″ strips. Because the sections of this shoe pattern are a little wider, I cut the paper into 1″x 12″ strips.
Fold the strips in half lengthwise. I find the final project is less bulky if you glue the folded strips closed with Mono or SNAIL adhesive. While most of the instructions I’ve seen for Iris Folding say to use scotch tape to secure the folded pieces, I find this creates added bulk and prefer to use Mono or SNAIL adhesive. Be sure to use a bone folder to get sharp, crisp crease.
Tip: Once you have decided on and have cut the paper you’d like for your design, lay the strips in front of you in the order that you will be using them. Keep them in this order as you are working on the pattern. Or write down a description of the design (circles, stripes, solids etc) and number them in the order of use in the margins of the pattern you are following. It can get confusing once you begin working with the paper, especially if you are working with a more complicated pattern.
This Victorian Shoe pattern calls for 4 paper designs. I decided to only work with 2 paper designs. I used 12″x12″ Springtime Vintage Designer Series Paper from Stampin’ Up!
Photo 4: View of back side of project with cut out laying over the pattern and adhered with painters tape to create a hinge. Two strips of patterned paper have been chosen and laid out:

This pattern calls for 4 colors. Again, I have chosen to use only 2 colors. I am substituting color #1 for color #3 and color #2 for color #4.
For this pattern color #1 will be placed on sections 1,2,3,4,5,9,13,17,21,25
color# 2 will be placed on sections 6,10,14,18,22,26
color#1 will again be placed on sections 7,11,15,19,23,27
color#2 will again be placed on sections 8,12,16,20,24,28
6. Begin with folded color #1 and following the pattern guide, place it over section 1 exactly against the line of the pattern with the fold facing towards the middle. Cut with a pair of scissors or hand-tear the paper to the size needed to fill the section. I usually just hand-tear the paper. Apply Mono or SNAIL Adhesive to only the outside facing ends to adhere the strips to the back of the project. If you apply it towards the center of the paper, the adhesive will show on the front of the project. Repeat, using color #1 on sections 2,3,4,5
7. Following the pattern guide, adhere color #2 to section 6.
8. Following the pattern guide, adhere color #1 to section 7.
9. Following the pattern guide, adhere color #2 to section 8.
Photo 5: View from the back, completed sections 1-8:

As you progress with the spiral sections, be sure to check your work by viewing the project from the front, lifting the card front using the hinge created with the painter’s tape.
Photo 6: View of front of card, completed sections 1-8:

10. Continue adding colors #1 and #2 to numbered sections following the pattern guide.
When you have completed all of the sections, the back of your project will look like this-
Photo 7: View of back side, completed sections:

11. It is time to add the iris to the center. Use a stamped or punched image or an attractive piece of paper to cover the hole in the middle, again adhering it from the back.
Photo 8: View from back side with paper added to the center for the iris:

Photo 9: View from front side:

12. I added brads to look like buttons on the shoe. From the front side, I pierced 4 holes using my paper piercing tool and mat, then inserted the brads, opening the “wings” on the back of the project.
Photo 10: View of front with brads for buttons:

13. Once complete, remove the painter’s tape and remove the project from the pattern. To finish, apply Sticky Strip to the 4 edges of the back side of Iris Folded design, then attach to the card base. I find that Sticky Strip best helps adhere the card front to the card base, especially with the bulk of the folded paper.
Iris Folded Victorian Shoe

Supplies Used:
Stamp Set: From the Heart
Ink: Rose Red
Paper: Garden Green, Very Vanilla, Springtime Vintage Designer Series Paper
Accessories: Iris Folded shoe pattern, printer, scissors, Big Shot, Framed Tulips Embossing Folder, SNAIL Adhesive, paper piercing tool and mat, Garden Green Brads, painter’s tape
Iris Folded Christmas Ornament Card-Instructions

1. Trace your design on card stock and then cut out with a pair of detail scissors. You may also use a punch, Big Shot and dies, or the Circles Scissors Plus from Stampin’ Up! For the Christmas ornament design below, I used this circle pattern and cut a 3” circle using the Circles Scissors Plus. Be sure to to do any embossing, stamping or other additions to the front of the card before starting the iris folding pattern. The front will be too bulky to add these designs afterwards.
2. Decide on your design and cut your paper into 3/4″ wide strips. The number of strips needed will depend on the pattern and the length of the paper. Fold the strips in half lengthwise. I find the final project is less bulky if you glue the folded strips closed with Mono or SNAIL adhesive. While most of the instructions I’ve seen for Iris Folding say to use scotch tape to secure the folded pieces, I find this creates added bulk and prefer to use Mono or SNAIL adhesive. Be sure to use a bone folder to get sharp, crisp crease.
Tip: Once you have decided on and have cut the paper you’d like for your design, lay the strips in front of you in the order that you will be using them. Keep them in this order as you are working on the pattern. Or write down a description of the design (circles, stripes, solids etc) and number them in the order of use in the margins of the pattern you are following. It can get confusing once you begin working with the paper, especially if you are working with a more complicated pattern.
Photo 1: 5 designs of cut 3/4″ x 12″ paper:

3. Lay the pattern down on your work surface face up. Lay your cut or punched piece of card stock FACE DOWN on the pattern. You always work with the back side of the project. Adhere the card stock to the pattern on the right or left side only using painters or scotch tape, creating a hinge so you are able to lift up your card stock to check the progress on the front side as you go.
Photo 2: Back side of card secured to pattern creating a hinge:

Photo 3: Hinged card opened to the front:

Photo 4: Strips of paper laid out in the order of use along the side of the pattern. You are ready to get started!

For this circle, pattern color 1 will be placed on sections 1, 6, 11, 16, 21, 26, 31
color 2 will be placed on sections 7, 12, 17, 22, 27, 32
color 3 will be placed on sections 8, 13, 18, 23, 28, 33
color 4 will be placed on sections 9, 14, 19, 24, 29, 34
color 5 will be placed on sections 10, 15, 20, 25, 30, 35
4. Begin with folded color 1, placing it over section 1 exactly against the line of the pattern with the fold facing towards the middle. Cut with a pair of scissors or hand-tear the paper to the size needed to fill the section. Apply Mono or SNAIL Adhesive to only the outside facing ends to adhere the strips to the back of the project. If you apply it towards the center of the paper, the adhesive will show on the front of the project.
5. Take color 2 and place it on the section 2 of the pattern. Take color 3 and place it on the section 3 of the pattern. Continue with color 4 placed on section 4 of the pattern and color 5 placed on section 5 of the pattern. You will now have completed the first spiral of the pattern.
Photo 5: 1st spiral of the pattern has been completed. View from the back side of project:

6. Continue working the pattern with color 1 placed on section 6, color 2 on section 7, color 3 on section 8, color 4 on section 9 and color 5 on section 10.
As you progress with the spiral sections, be sure to check your work by viewing the project from the front, lifting the card stock using the hinge created with the painter’s tape.
Photo 6: 2nd spiral of the pattern has been completed. View of the back side of the project:

7. Continue working the pattern in sections until you have a hole in the center which is the “iris”.
Photo 7: Back side of completed pattern with hole in the center left for the iris:

8. When you have completed the pattern, it is time to add the iris to the center of the pattern. Use a stamped and punched image or an attractive piece of paper to cover the hole in the middle, again adhering it from the back.
Photo 8: Front view of Iris with rhinestone brad in the center.

9. Once complete, remove the painter’s tape and remove the project from the pattern. To finish, apply Sticky Strip to the 4 edges of the back side of Iris Folded design, then attach to the card base. I find that Sticky Strip best helps adhere the card front to the card base, especially with the bulk of the folded paper.
Iris Folded Christmas Ornament Card

Supplies Used:
Stamp Sets: Sweet Centers (the top of the ornament), Cute by the Inch (iris) and Four for the Holidays (greeting)
Ink: Cherry Cobbler
Paper: Cherry Cobbler, Very Vanilla, Jolly Holiday 12 x 12 Designer Series Paper cut into 3/4″ x 12″ strips. I used approx 1 1/2 strips for each part of the pattern.
Accessories: Big Shot, Finial Press Embossing Folder, Circle Scssors Plus and Glass Cutting Mat, 1 1/4″ square punch, rhinestone, paper piercing tool and mat, sticky strip
Iris Folded Balloon Card
As promised, I have completed my iris folding video tutorial! Still learning the ropes, especially when it comes to the lighting. Check below for the video link. Please leave a comment. I’d love to hear what you think.
I used my stamp-a-ma-jig to align the gondola to the punched circle. I have learned to really like the stamp-a-ma-jig!
Stamp Set: Sweat Centers, Stem Sayings
Paper: Whisper White, Rich Razzleberry, Razzleberry Lemonade DSP
Ink: Rich Razzleberry, Ballet Blue, Pixie Pink, Lovely Lilac (for clouds)
Accessories: 1 3/4″ Circle punch, Scallop Circle punch, Large Scallop Circle die, Big Shot
To download the circle pattern, click here


